

How To Set Up Recurring Emails In Outlook
When sending an email (a new message, reply or forward) in Outlook, the program has a nasty habit of changing the font face, size, paragraph spacing, etc. to the one used in the previous message or imposed by the default style. This problem specifically refers to the general paragraph rules.
In MS Word and also other text editors, it is common practice to treat theEnter key as a new paragraph and theShift + Enterkeys combination as a new line of text. In Outlook, however, there is no difference between these actions. No matter if the Enterkey orShift+Enter keys are used, always only a new line of text is created. If a user wants to make a new paragraph, he or she needs to double-hit the key. This leads to discrepancies in how the text is presented in mail clients other than Outlook, not to mention the additional work for the writer.
A solution other than using the doubleEnterkey, is to modify the default, Normal style in Outlook. The drawback is that the modified Normal style is applied only to the new message, and not to the reply or forward.
Another approach is to create a custom style from scratch that will work better than Normal and be applied to both – new emails and replies/forwards. Unfortunately, this is not a full solution either as the custom style is not active by default when opening the message editor, and you need to switch to it manually every single time.
A complete solution is to have a custom style, which is automatically enabled by an Outlook macro when composing new emails, replies or forwards. Below you will find step-by-step instructions on how to achieve this.
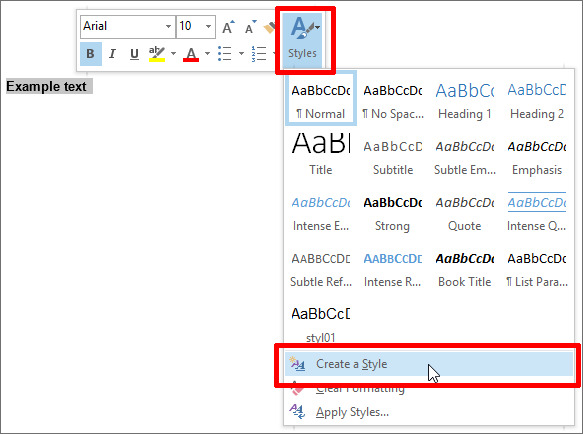
Step 1. Create your custom style. To do it, start off by creating a new email in Outlook and typing a bunch of words. Then highlight these words, which will bring up the hovering menu with the Styles button. Hit the Styles button and then the Create a style button.
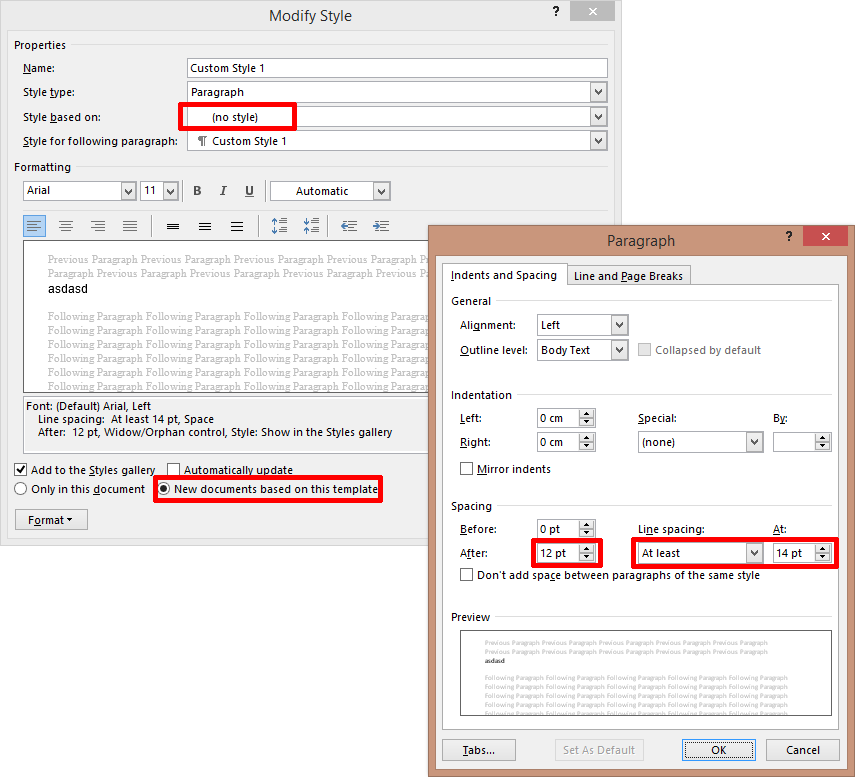
Step 2. In the resulting window type in the name of your style, e.g. Custom Style 1, and then click Modify to define all the aspects and formats used in it. Below you can find a screenshot of all the settings that should be applied. In short they are:
- the Style based on option should be set to (no style)
- In the Formatting section set your font face and size, e.g. Arial, 11
- make sure that the option New documents based on this template is marked
- click Format button at the bottom and open the Paragraph window. In the Spacing section set the After value to 12 pt, the Line spacing to At least and the At: value to 14 pt.
Step 3. Save your settings by clicking the OK buttons all the way out to the new email you created, then send it as a test message to yourself or different email account.
Step 4. Reply to the test message from Outlook, but don't send it yet. Instead, type any words in the reply, highlight them to bring up the hovering menu with the Styles button. Press the Styles button, find the new style you created in Step 1, right-click it and choose Modify… .
Step 5. In the Modify Style window replicate the settings you introduced a moment ago in Step 2. Don't forget about checking New documents based on this template and setting the Style based on option to (no style).
Step 6. After making sure that all settings have been replicated correctly, OK your way out of the Modify Style window and send the reply.
Step 7. Repeat Steps 4 and 5, but this time forward the test message from Outlook.
Step 8. Test the new style with different messages, preferably received from other users.
With your style ready, it is time to set it as the default one with a macro. To do so:
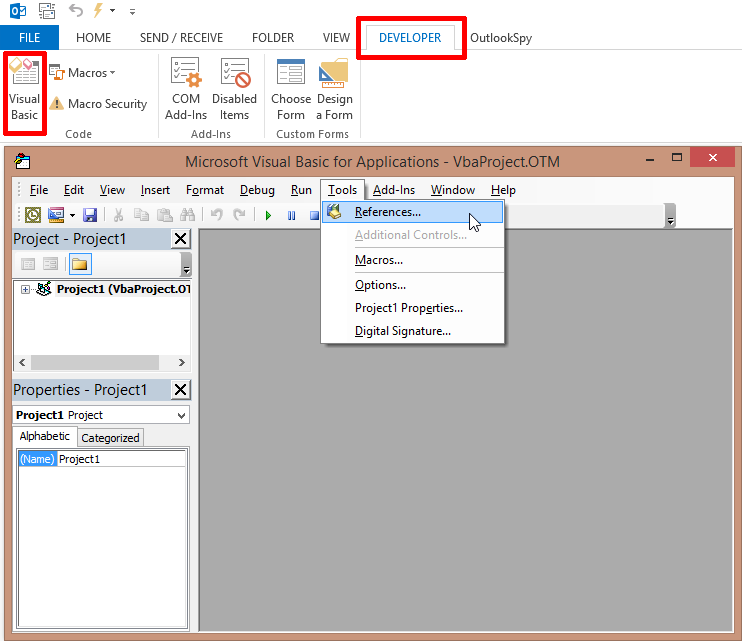
- Show the Developer Tab on the Ribbon in Outlook.
- In the Developer Tab click Macro Security and change it to Enable all macros.
- Click the Visual Basic button. In the next window click the Tools menu on top and select References.
Make sure that the Available References list shows the following positions checked:- Visual Basic For Applications
- Microsoft Outlook 16.0 Object Library
- OLE Automation
- Microsoft Office 16.0 Object Library
- Microsoft Office 16.0 Access Database Engine Object Library (or Microsoft DAO 3.6 Object Library for older versions of MS Office)
- Microsoft Word 16.0 Object Library
NOTE: Some of these libraries show a version that depends on what MS Office suite you have. In MS Office 2019, 2016 and 365 the version is 16, in MS Office 2013 it's 15.0, in Office 2010 it's 14.0, and in Office 2007 it's 12.0. The Microsoft DAO Object Library is the same across all these suits of Office.
- Once you have the above references set click the OK button.
- While still in the Visual Basic, open the project window by expanding the project tree in the left pane and double clicking ThisOutlookSession:
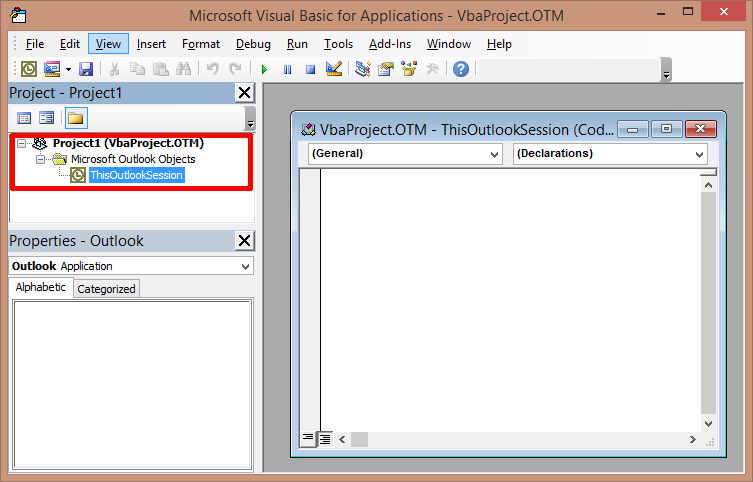
- In the new window that pops up copy and paste the following macro code:
Public WithEvents OutlookInspectors As Outlook.Inspectors Public WithEvents myOlExp As Outlook.Explorer Public WithEvents myIns As Outlook.Inspector 'startup Outlook Private Sub Application_Startup() Set OutlookInspectors = Application.Inspectors Set myOlExp = Application.ActiveExplorer End Sub Private Sub OutlookInspectors_NewInspector(ByVal Inspector As Inspector) Set myIns = Inspector End Sub Private Sub myOlExp_InlineResponse(ByVal item As Object) 'Change the name of the style to your own 'The name is case sensitive Dim objStyleName As String objStyleName = "Custom Style 1" Dim objEditor As Word.Document Dim objStyle As Word.Style 'Check if the message is Plain Text. If so - end the macro as Plain Text does not support styles 'Bodyformat: '1 - plain text '2 - html '3 - rtf If ActiveExplorer.ActiveInlineResponse.BodyFormat = 1 Then Exit Sub Set objEditor = ActiveExplorer.ActiveInlineResponseWordEditor Set objStyle = objEditor.Styles.item(objStyleName) 'No need to set the same style again - it can break copy-paste option and duplicate text 'If you have changed style to other than defined in objStyleName program can still duplicate text If objEditor.Windows(1).Selection.Style = objStyle Then Exit Sub objEditor.Windows(1).Selection.Style = objStyle Set objEditor = Nothing Set objStyle = Nothing End Sub Private Sub myIns_Activate() 'Change the name of the style to your own 'The name is case sensitive Dim objStyleName As String objStyleName = "Custom Style 1" If myIns.IsWordMail() = False Then Exit Sub Dim objEditor As Word.Document Dim objStyle As Word.Style Dim objItem As Object Set objItem = myIns.CurrentItem 'Check if object is empty If objItem Is Nothing Then Exit Sub 'Check the type of the item np. Meeting request Dim iStringPos As Integer iStringPos = InStr(objItem.MessageClass, "IPM.Note") If iStringPos = 0 Then Exit Sub 'If the object is flagged as sent, it means this is the uneditable content If objItem.Sent = "True" Then Exit Sub 'Check if the message is Plain Text. If so - end the macro as Plain Text does not support styles 'Bodyformat: '1 - plain text '2 - html '3 - rtf If objItem.BodyFormat = 1 Then Exit Sub If myIns.EditorType = olEditorWord Then Set objEditor = myIns.WordEditor Set objStyle = objEditor.Styles.item(objStyleName) If objStyle Is Nothing Then Exit Sub 'No need to set the same style again - it can break copy-paste option and duplicate text 'If you have changed style to other than defined in objStyleName program can still duplicate text If objEditor.Windows(1).Selection.Style = objStyle Then Exit Sub objEditor.Windows(1).Selection.Style = objStyle End If Set objEditor = Nothing Set objStyle = Nothing Set objItem = Nothing End Sub
Make sure to change the style name to your own, as described in the macro's comments. In this case it should be Custom Style 1.
- Save the project by clicking the blue disk icon visible on the top, or by using the Ctrl+s keyboard shortcut.
- Restart your Outlook.
That's it – from now on your custom style is the default one when writing a message in Outlook, even if a different formatting was used in the email you are responding to. This way you can make sure that the correspondence look is unified and not altered by other users.
How To Set Up Recurring Emails In Outlook
Source: https://www.codetwo.com/admins-blog/set-email-reply-format-automatically/
Posted by: fraleymorte1968.blogspot.com
0 Response to "How To Set Up Recurring Emails In Outlook"
Post a Comment